Showing posts with label 12 projects of 2018. Show all posts

Friday, 18 January 2019

RECAP: 12 PROJECTS OF 2018

So here we are in 2019! I set a goal for myself last year to do 12 DIY projects, and so thought I'd do a little recap of how that went. I'm quite happy to say that I ended up completing eight projects. Well, I technically completed a few more than that, but I never did a blog post on them so I'm not counting them. Either way, I didn't make it to twelve, but I'm still pretty happy about how this goal went, as I feel it did wonders to reboot my creativity. So here's a rundown of the projects I made:

My first project was this wool roving wall hanging (above) that I made in January. I'd never made anything like it before, but I had such a good time making it and loved the result! It's currently hanging in our living room and love it so much. Might make a similar one in a bigger size in the future?

The second project was a fox costume for Oscar. I made a simple tail and ear set out of yarn that I brushed with a comb to get a faux fur effect. Such an easy technique, and so fun to make. Oscar wore this as part of his outfit for a dress-up event in his daycare when he went as Mikkel Rev, a beloved Norwegian children's character.


For my third project, I made these matching bib and teether baby shower gift sets for some friends who were expecting babies. They were so easy to make and I loved how they turned out. Such a perfect way to use up scrap bits of fabric, too. Would love to make more of these in different fabrics.


For my fourth and fifth projects, I went on a bit of a macrame spree, and made two macrame plant hangers as well as some macrame teethers. Both were made out of materials I already owned, which was also pretty satisfying, and I discovered a new (to me!) craft that I ended up absolutely loving.


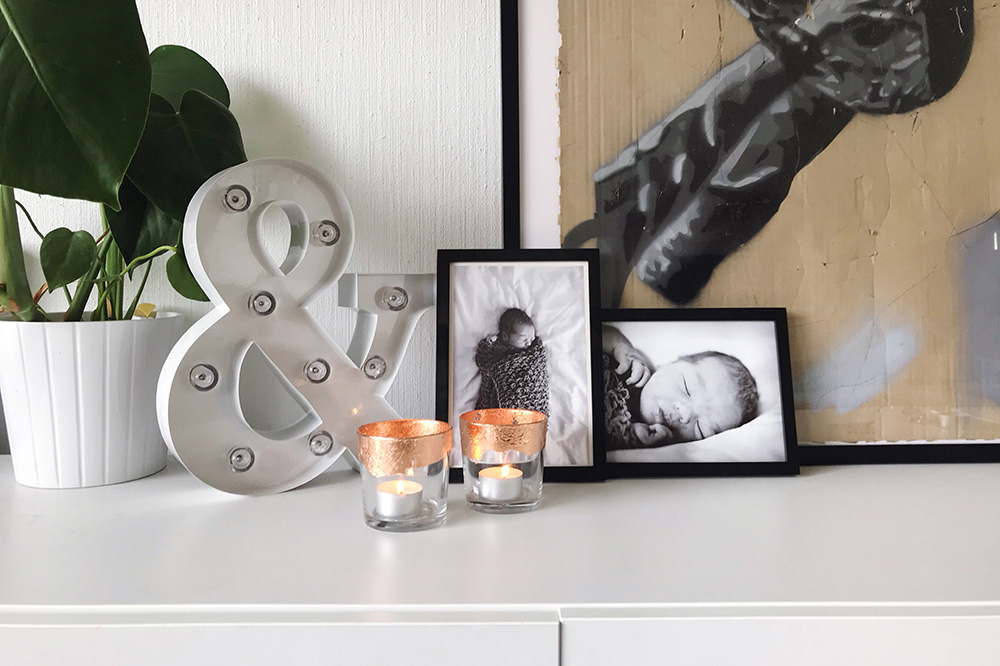
For my sixth project, I decided to step away from the textiles for a little bit and made some gilded tea light holders for autumn out of some old glasses and a bit of gold leaf.


For my seventh project, I got my sewing machine out and made these plushies based on Mac Barnett and Jon Klassen's kid's books Triangle and Square. Oscar was a huge fan!


For my eight project, I made a couple of ghost tea light holders out of clay for Halloween. We don't have a whole lot of Halloween decorations, so these were a pretty fun addition.


Honorable mentions: I also knitted quite a few things this year (not sure why I decided not to include knitting projects in this?), and completed the following knitting projects in 2018: matching hats for Oscar and Graeme, the Homestead shawl, 2 x Tjukklua hats, and this sweater (though I technically started that one in 2017), the No Frills sweater, the Skappel sweater, another Anker sweater, the Tiril sweater, the Tjukklendar sweater, another No frills sweater, two Christmas stockings and even more hats, hats, and five more hats. 2018 was probably the biggest knitting year for me to date, so much so that I decided in 2019 to start a new instagram account for my knitting, so if you'd like to follow along you can find me on @hildeandherknitting. Looking forward to another creative year!

Tuesday, 6 November 2018

CLAY GHOST TEALIGHTS


Hope everyone had a fun Halloween last week! We decorated pumpkins, got dressed up and went trick or treating with a neighbor. I think Oscar thought it was a bit scary at times (it was his first time trick or treating!), but he definitely appreciated all the lollipops that were being handed out!

I've been incredibly slow at decorating for fall this year. Usually I at least have a few pinecones and conquers kicking around the house by now, but this year all I've got out are some candles that I basically have out all year anyway. So to make our home a tiny bit more ready for Halloween, I decided to make these little cuties.


I got the idea from here, and just used some white air-dry clay that I rolled out and shaped into ghosts. I used a straw to punch out the eyes. After that I just let them dry for a couple of days and then added some led tealights. They were pretty cute sitting next to our giant pot of candy on Halloween!

Saturday, 29 September 2018

DIY TRIANGLE & SQUARE PLUSHIES

Oscar has been requesting we read Mac Barnett and Jon Klassen's Triangle and Square (he calls them "Tralung" and "Quare") every night at bedtime for I don't know how many weeks now, so for my seventh project of 2018 I decided to get my sewing machine out and sew a couple of Triangle and Square plushies. Jon Klassen's illustrations are so cute, so I pretty much had a giant smile on my face the whole time I was making these. :)


They were super simple to make, too. To make them, I googled the images and edited them in photshop so that they were the right size. I had no problems finding a front and back picture of Square, but for some reason I could only find the front of Triangle, so I made my own back in photoshop based on the image of his front. It turned out pretty good. I printed everything on unbleached cotton using this technique (ooold post! It's the same I used to make this printed banner), and then sewed them together and stuffed them. One thing that might be an issue with this later, is that the ink bleeds pretty much straight away if it's in contact with water (as you can see on square's back below, where a couple of drops of water dripped from my iron). So if I were to make them again, I might get the files printed via Spoonflower rather than use my home printer, just so it'd be a bit more durable/toddler proof.


Oscar was so excited when he saw them, and in retrospect we probably shouldn't have given them to him half an hour before his bedtime haha. But it was so fun seeing his reaction. There's nothing like seeing the things you make actually get used and appreciated!

Monday, 20 August 2018

GILDED TEALIGHT HOLDERS

Guys, I am so ready for fall and for cozy nights in with warm cups of tea, blankets and candle light! I don't usually get excited about autumn, but I think the fact that our summer has been so fantastic this year has really helped. I struggle to get excited about autumn when it sometimes feels like it starts in June haha.

I have a tendancy to turn into a bit of a candle addict though, and easily go through one of those 100-packs of tealights from IKEA during the autumn and winter months, so I decided to make a couple of tealight holders. I also had some gold leaf lying around in my craft supplies closet that I'd bought by mistake earlier (I thought it was just shiny paper, it just said "metal sheet" on it haha), so wanted to play around with that. They ended up being a little more rustic looking than I had in mind, but I love the golden glow they add, and how they reflect and kinda bounce around the light. Cozy autumn vibescheck!

To make them, I used some old candle holders from IKEA, some gold leaf from Søstrene Grene, and some glue I found in my stash (I don't really think I used the right glue, which probably contributed to the results haha). Gold leaf isn't the easiest to work with, but i'm still encouraged to try other projects with it. I've also been thinking about making something out of clay, and I reckon some gold leafing might look nice with that?

Sunday, 24 June 2018

MACRAME TEETHERS


Yay, another macrame project! Told you this stuff was addicting. As I mentioned in my bibs and teethers post, I have a lot of wooden rings left over (still do!), and as I have a lot of friends having babies right now, it seemed like a good idea to make some more teethers. I love giving away homemade gifts, and I think these turned out pretty cute, too!


I used the same t-shirt yarn I used for the macrame plant hangers, so I didn't end up buying any new materials for this project either. I did some simple techniques I found on pinterest, tied them off and then trimmed the ends. Pretty happy with the result!


Wednesday, 30 May 2018

MACRAME PLANT HANGERS

I love knitting and crochet, and I really enjoyed my weaving project, so is anyone surprised that I tried macrame and loved that too?

Honestly, I don't know why i haven't tried macrame before haha. It's such a satisfying craft. So much so that in pretty much the same sitting, I ended up making another project too (which I'll probably share later), and I have so many ideas for other macrame projects I want to try. I mean, I literally went to bed that night and ended up dreaming about macrame. I'm also a little bit sad that I already own a hammock--what an amazing macrame project that could have been! I want to macrame everything.

To make these, I used wooden rings leftover from my fabric teethers, some old t-shirt yarn and tutorials and techniques I found on pinterest. The t-shirt yarn is actually leftovers from an abandoned project years ago. Anyone remember this knitted poof project? Yeah, it ended up as a bit of a ufo, just lying around waiting for me to get the motivation to finish it, before I eventually admitted to myself that it just wasn't happening and that it was time to unravel it. And by then, Graeme had actually bought a very similar poof for Oscar's nursery anyway. But yay for reusing old materials in new projects, and not just going out to get more craft supplies every time a creative whim strikes! That might be my goal for next year actually, to only do projects using stuff I already have. Should be doable with all the craft materials I'm hoarding!


Here they are hanging in their natural habitat. Have you tried any new crafts that you've ended up absolutely loving recently?

Sunday, 25 March 2018

BIBS & TEETHERS BABYSHOWER GIFT SETS


My poor sewing machine had been sitting collecting dust for far too long, so for my third project I needed something to get my sewing mojo back. Lucky for me, I also have a few friends who are expecting babies pretty soon. Perfect opportunity to sew a couple of baby-sized projects, no?


So I brewed myself a pot of tea, put on some music and started sewing. I used these free patterns from See Kate Sewprobably my favorite sewing blog. I bought the fabric from a local shop, some terry cloth for the backing, and wooden rings I found on Amazon. I didn't want the terry cloth to be too thick and bulky, so I just used some thin towelscheap and cheerful!


This was such a fun and simple sewing project, and I love how they turned out. It's a perfect way to use up old scraps of fabric too, which I kinda wish I had thought of before I went out and bought fabric. I still have leftovers from when I made this skirt and this dress, and how cute would that be, a black gingham set and a pink floral set? Note to self: remember to check your craft stash before you hit up the craft shop haha.

The wooden rings were part of a 20 pack though, which means I have quite a few rings left. I'll definitely be making more of these, but probably not a full 20 sets haha. Does anyone have any suggestions for something else I can use the wooden rings for? A wall hanging perhaps? Or a plant hanger?

Saturday, 17 February 2018

FOX COSTUME

Last week they had a day of dress up in Oscar's nursery for Fastelavens, and on that occasion we decided to dress him up as Mikkel Rev from Dyrene i Hakkebakkeskogen. Graeme sourced the clothes, while I sat down and made a fox tail and a set of fox ears.

If you have no idea what I'm talking about: Mikkel Rev is a much loved character from the stories of Norwegian author Thorbjørn Egner. I grew up with these stories myself, and they've recently had a bit of a revival as they've been made into a stop motion animation (looks like it's also been translated into quite a few languages?). It's really cute and Oscar is a big fan. (He also has a fox teddy which is his favorite, and was actually the original inspiration behind the whole fox costume idea.)


Now, of course we could have just bought the costume online, but I thought it was kinda pricey and mainly, where's the fun in that? So after doing a bit of research around pinterest and the web, I decided to make the tail out of yarn. It's a pretty simple technique, where you essentially just make a bunch of yarn tassels and then brush them out to make the yarn look more like fur. I was a bit sceptical of how it was gonna end up looking, but I'm so happy with the result and it was so much fun to make haha. I mean how cute is that little fox butt? I used the same brushing technique for the ears and then used a ton of hairspray to make them a bit sturdier and sewed them onto the hat. Hey presto, there's your fox.

Wonder what other animal costumes I could make using this technique? Or maybe Oscar will be going as Fantastic Mr. Fox for next Halloween? Haha

And lastly, of course, a couple of photos of the costume in action:

Sunday, 21 January 2018

WOOL ROVING WALL HANGING

So somewhere along the line, life got a bit busy and I stopped finding time for creative projects. Don't get me wrong, I've still had a couple of knitting projects on the go and I've completed three photo books too (I'll share these later), but it feels like it's been a long time since I sat down and focused 100% on making something new.

And last weekend, after a bit of a hard week, I sat down, brewed myself a cup of tea, put on a favorite podcast, got some materials out and started making a wool roving wall hanging. I've never made anything like this before (though I do remember doing some basic weaving back in school when I was about six—does that count?), but I googled a couple of tutorials and looked at Pinterest for some inspiration, and it was just so wonderful to just sit down and try something new, something just for fun. I need to do this more often. Making stuff is my zen.


So one of my goals for 2018 is to complete 12 projects. I'm counting this wall hanging as my first. And then I thought maybe if I share my projects here on this blog, that might make me a bit more accountable and likely to finish them all, so here I am, writing away. I haven't made a set-in-stone plan for what the next 11 projects will be, but I've had a good brainstorm and just really looking forward to trying new things in general and being creative.

For this wall hanging, I used the lid of a pizza box to make the loom, some old weaving threads that I inherited from my grandmother (she was an avid weaver and did huge, complicated tapestries), and three packs of wool roving that I bought for 20 kroner each. So in total, this project cost me 60 kroner. The little wooden beam I just had lying around, leftover from an orchid I managed to kill a while ago.


I went for a pretty abstract look, where my only plan was to try to make some thick braids that faded into thinner braids, and then do some basic weaving in between to even it out. The wall hanging is far from perfect (and I'm not actually sure it fits the space it was originally intended for), but I had such a good time making it and would love to make something similar again.


So here's to a creative 2018 and hopefully 11 more creative projects!