Thursday, 27 February 2014
DIY CLOUD PILLOW
I had a bit of leftover fabric from my previous pillow project (Honestly, who buys half a meter of fabric to cover one button? What was I thinking?), so I decided to turn it into another pillow. I toyed around with the idea of making a smaller, inverse version of that previous pillow project (beacuse surprise, surprise, I have leftovers from the dark grey fabric too), but since it's a woolen, fluffy fabric I decided it'd be perfect for a cloud shaped pillow. And since my plan was to have this pillow in my guest bedroom, it seemed like a good fit!
To make my cloud pillow, I drew and cut out a cloud-shaped pattern on some butcher paper. I pinned my pattern to the folded fabric (making sure the right sides were facing each other so that I'd end up with two corresponding cloud shapes), and cut it out, leaving about a centimeter for seam allowance. Right sides still facing each other, I pinned the two shapes together and sewed around roughly one centimeter from the edge, leaving a gap of about 5 centimeters at the end. I then turned the pillow inside out, stuffed it and sewed up the gap by hand.
And voila, the cloud pillow now sits happily in my guest room with my DIY headboard! Think I might need to do some more pillow projects though, as I feel it looks a bit lonely, don't you think?
Labels:
DIY projects,
sewing
Sunday, 23 February 2014
WHAT I’M WORKING ON: WRITING SOME LETTERS!
I love post. I used to write letters all
the time, but it’s fizzled out a bit over the years. However, my sister got me
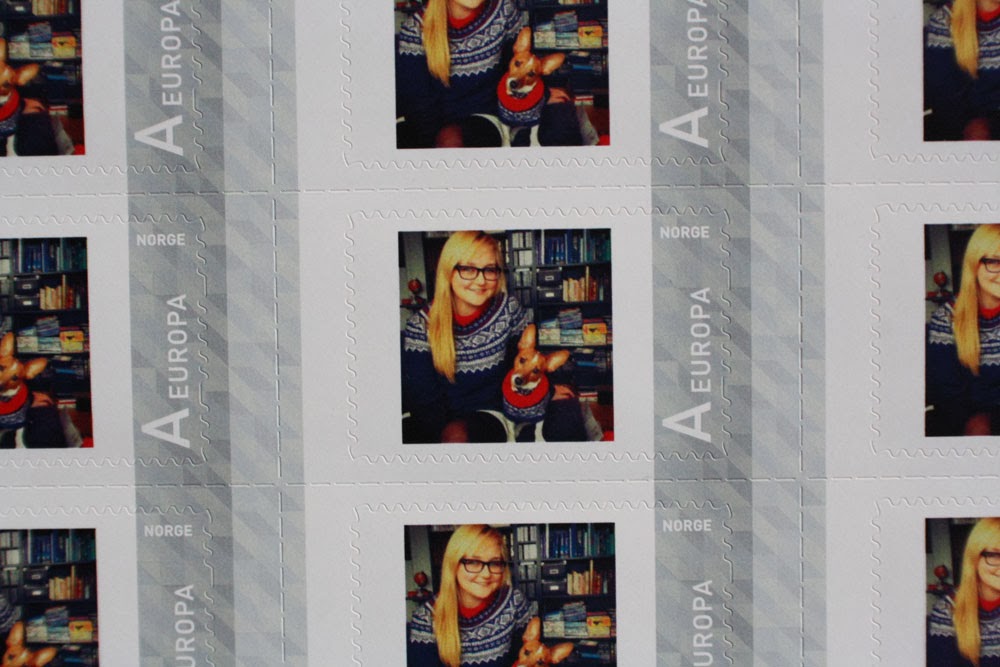
these amazing stamps for my birthday the other week, which has totally motivated me
to write some letters again. And no, your eyes are not deceiving you, those are
stamps of me and my dog Bo, both wearing matching Marius sweaters (knitted by
my mother—she’s knitted one for Graeme too!). Awesome, right?
Wednesday, 19 February 2014
MORGANITE CARDIGAN PROGRESS II
I’ve been quite busy recently, so I feel I’ve
ended up somewhat neglecting my Morganite cardigan knitting project a little.
In between a few bigger DIY projects around the house, a visit from Graeme and
my Amsterdam trip, I’ve also been
reading a lot too, and unfortunately I’m not very good at knitting and reading
at the same time. So last night I decided I needed to get back into it and got
my yarn basket out. I am now on the 3rd ball of yarn, and I have about 5 cm left
before I get to the lacey part. I’m looking forward to being
done with the stocking stitch section as it gets a bit monotonous, but that
means I’ll also soon be leaving my comfort zone and learning the very
complicated looking lace stitch that will make up the rest of the cardigan. I’m
hoping YouTube will show me the ways!
PS. Amsterdam was lovely, and I handed in a few rolls of 120 film today to get developed so I’ll probably be sharing those soon!
Wednesday, 12 February 2014
PACKING FOR AMSTERDAM!
I am away to Amsterdam for a long weekend with my friend! We're celebrating our birthdays together and I am so excited. I've been to Amsterdam a few times before (last summer at the latest), but I'm hoping this time I'll finally get to go on a boat ride in the canals! Hope you have a good weekend too!
Monday, 10 February 2014
DIY REPURPOSED WOOD HEADBOARD
I’ve been slowly but surely turning the spare room into a guest room. Unfortunately I don’t have a before picture, but if you close your eyes and imagine a square room full of boxes with baby blue walls and floral borders near the ceiling and cream velour curtains, then you’re pretty much there. Last summer however, the boxes were removed, it was painted white and I hung up some light and airy curtains. Then the room sat empty for a few months before I bought a double bed and moved in a pair of old JVC speakers in as bedside tables. It still looked pretty bare though, so making a headboard has been on my to-do list for a while.
I’ve actually been wanting to make a headboard for years. I’ve seen so many different headboard projects, and they look like so much fun to make! I actually started a fabric one a few years ago in our old Glasgow flat, and it was going great until I tidied it away in a closet for a bit and Bo decided to turn it into a bed and completely ruined it.
This time though, I wanted to make one out of wood. I’ve seen so many cool repurposed wood headboard projects, and as I just happen to have a garage full of random bits of wood leftover from previous projects it seemed like the perfect fit. So one evening I finally got the stepladder out and rummaged through the attic of the garage, where I found some suitable wood. I cut the wood down to size so that each plank was 2 meters long, and my two support blanks in the back were 1 meter long (I based these measurements on the size of the bed itself). Once the wood was assembled, I stained the headboard with a stain called “driftwood” to get the aged wood effect. And ta da! I only used one coat of stain, as I really wanted the numbers on the planks to shine through for an industrial effect. I’m so happy with the result I’ve actually been leaving the door to the guestroom open, as it makes me smile when I walk past it haha. Guests welcome!
Labels:
DIY projects
Sunday, 2 February 2014
STOOL RECOVERY
I was in one of my favorite craft shops recently buying more yarn for my Morganite cardigan, when I came across this weird yarn on sale called RibbonXL. I’ve been wanting to crochet with one of these types of yarn things for a while now, and felt I had a little light bulb moment as I picked it up and envisioned a crochet cover for this old ugly stool I have. The stool has been in the house longer than I have, and has been used regularly. The top is worn and covered in paint stains, but it’s still a really good and sturdy stool.
I grabbed my size 9 hook and started crocheting, using a double crochet stitch. Since the yarn was so thick and the crochet hook so big, it was a pretty quick job. Once the cover was finished, I stitched it in place using the same yarn. The yarn is pretty stretchy, so the cover fit like a glove.
I liked the end result, but I was a little unsure about the color at first. I didn't quite realize it when I was buying it in the shop, but it's a little mossy in person, and I think I would have preferred it to be more grey. I think it's grown on me now though, and it's a definite improvement from what the stool was like before!
Labels:
DIY projects
Subscribe to:
Posts (Atom)