Ok, this project has taken me an embarrassing amount of time to finish, and I don't even really know why. The curtains and the rods were bought way back in autumn 2016. Can we just stop and let that sink in? Why in the world would it take anyone almost two years to hang up some curtains? I wish I had a good answer haha.
There was a lot of back-and-forthing involved, of course. First, I pinned the curtains and hung up one to test it and decided I didn't like the length. Then that one curtain panel (in the wrong length) hung on the right by the door for far too long, until one day I (I think it was me? I don't even think I can blame the dog or the toddler here?) managed to step on it while I was letting the dog out which resulted in the rod getting pulled off the wall. That one panel in the wrong length migrated to the middle of the rod to semi-shield us from the sun as it sets, and then it just sat like that for even longer. I guess they were never really a priorty as we had a lot of trees and bushes at the back of our garden, but then this summer a lot of them were removed which made it feel a little bit more needed. So that's when I finally decided enough was enough, got Graeme to fix the curtain rod and then sat down to sew.
It wasn't smooth sailing from there either though, of course. The first panel went ok. I decided that I didn't like the look of the long loops at the top, so I folded them over and sewed them in place and then re-pinned the bottom accordingly. But when I tried to repeat the process for curtain panel number two, I learnt that it was a good 5 cms shorter than the first panel! Luckily I pinned and did a test hang before I actually sewed anything! The third curtain turned out to be even shorter, so I had to repeat the process there too. So if you look closely (please, don't haha), you can see that the hemming on the bottom looks completely different on all three panels haha. Luckily, it isn't actually noticable at all though, so it doesn't bother me. I'm just really glad to finally have these curtain panels up haha.
For now I really like it like this, as I love these big windows and I don't like a whole lot of fabric obstructing the view. I don't have any curtains on the opposing windows for that exact reason. Maybe I'll change my mind on it in the future? Just give me like 10 years or something?
Showing posts with label sewing. Show all posts
Thursday, 4 October 2018
Saturday, 29 September 2018
DIY TRIANGLE & SQUARE PLUSHIES
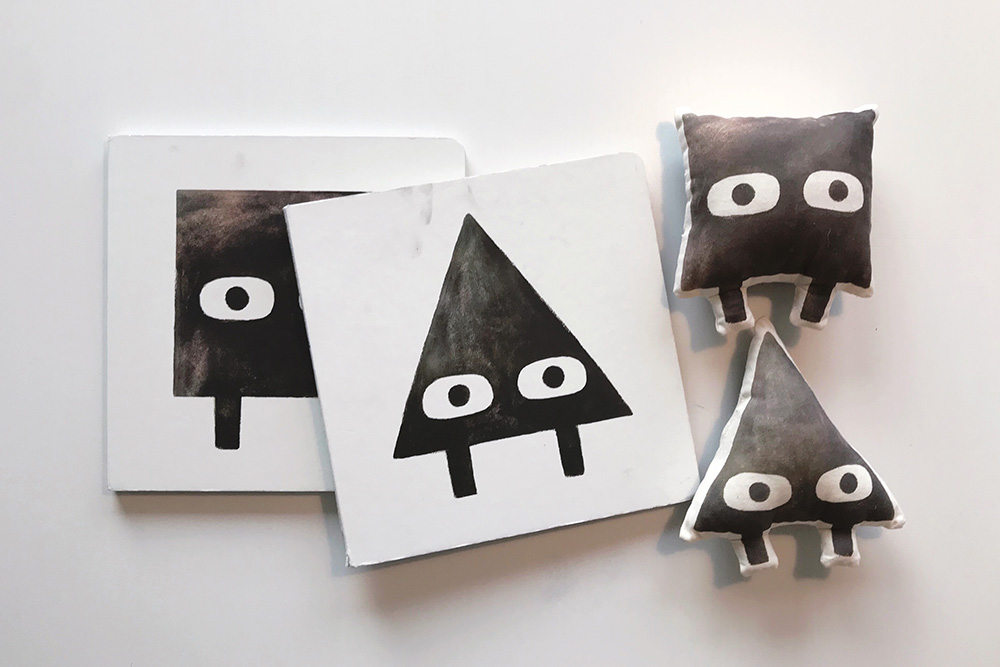
Oscar has been requesting we read Mac Barnett and Jon Klassen's Triangle and Square (he calls them "Tralung" and "Quare") every night at bedtime for I don't know how many weeks now, so for my seventh project of 2018 I decided to get my sewing machine out and sew a couple of Triangle and Square plushies. Jon Klassen's illustrations are so cute, so I pretty much had a giant smile on my face the whole time I was making these. :)
They were super simple to make, too. To make them, I googled the images and edited them in photshop so that they were the right size. I had no problems finding a front and back picture of Square, but for some reason I could only find the front of Triangle, so I made my own back in photoshop based on the image of his front. It turned out pretty good. I printed everything on unbleached cotton using this technique (ooold post! It's the same I used to make this printed banner), and then sewed them together and stuffed them. One thing that might be an issue with this later, is that the ink bleeds pretty much straight away if it's in contact with water (as you can see on square's back below, where a couple of drops of water dripped from my iron). So if I were to make them again, I might get the files printed via Spoonflower rather than use my home printer, just so it'd be a bit more durable/toddler proof.
Oscar was so excited when he saw them, and in retrospect we probably shouldn't have given them to him half an hour before his bedtime haha. But it was so fun seeing his reaction. There's nothing like seeing the things you make actually get used and appreciated!
They were super simple to make, too. To make them, I googled the images and edited them in photshop so that they were the right size. I had no problems finding a front and back picture of Square, but for some reason I could only find the front of Triangle, so I made my own back in photoshop based on the image of his front. It turned out pretty good. I printed everything on unbleached cotton using this technique (ooold post! It's the same I used to make this printed banner), and then sewed them together and stuffed them. One thing that might be an issue with this later, is that the ink bleeds pretty much straight away if it's in contact with water (as you can see on square's back below, where a couple of drops of water dripped from my iron). So if I were to make them again, I might get the files printed via Spoonflower rather than use my home printer, just so it'd be a bit more durable/toddler proof.
Oscar was so excited when he saw them, and in retrospect we probably shouldn't have given them to him half an hour before his bedtime haha. But it was so fun seeing his reaction. There's nothing like seeing the things you make actually get used and appreciated!
Sunday, 25 March 2018
BIBS & TEETHERS BABYSHOWER GIFT SETS
My poor sewing machine had been sitting collecting dust for far too long, so for my third project I needed something to get my sewing mojo back. Lucky for me, I also have a few friends who are expecting babies pretty soon. Perfect opportunity to sew a couple of baby-sized projects, no?
So I brewed myself a pot of tea, put on some music and started sewing. I used these free patterns from See Kate Sew—probably my favorite sewing blog. I bought the fabric from a local shop, some terry cloth for the backing, and wooden rings I found on Amazon. I didn't want the terry cloth to be too thick and bulky, so I just used some thin towels—cheap and cheerful!
This was such a fun and simple sewing project, and I love how they turned out. It's a perfect way to use up old scraps of fabric too, which I kinda wish I had thought of before I went out and bought fabric. I still have leftovers from when I made this skirt and this dress, and how cute would that be, a black gingham set and a pink floral set? Note to self: remember to check your craft stash before you hit up the craft shop haha.
The wooden rings were part of a 20 pack though, which means I have quite a few rings left. I'll definitely be making more of these, but probably not a full 20 sets haha. Does anyone have any suggestions for something else I can use the wooden rings for? A wall hanging perhaps? Or a plant hanger?
Thursday, 9 February 2017
GOLDIE DOLL
My niece turned two a couple of weeks ago, and for her birthday I made her this awesome Goldie doll from See Kate Sew! Honestly, these dolls are the cutest. I'm pretty sure if Oscar had been a girl I would have made him all of them by now!
I chose to make her the Goldie doll as both Goldie and my niece have blonde hair. I gave her two striped bows in her hair, included a pink skirt, a mint skirt with a cat print, and the teddy bear and ice cream cone as accessories. My niece seemed mostly interested in the ice cream cone at first, but I'm hoping she'll end up loving this doll as much as I do!
Thursday, 25 February 2016
DIY STUFFED WHALE TOY
I think this might be my favorite project for our little guy so far. I was looking for kiddo project inspiration on Pinterest (you can check out my kiddo board here), when I came across the cutest whale DIY (with free pattern!), and pretty much knew I had to try to make my own version straight away. I’d seen tons of more cartoony whales and other creatures before, but I loved how this one was a bit more “realistic”. Stuffed toys were probably my favorite toys when I was a kid (along with Legos), so who knows, maybe they will be for my kid too? I still have my favorite, a tiny yellow dog named Tussi (Norwegian translation for Eeyore), and he’s been with me everywhere.
The original is made out of denim, but I wanted to make one out of something a bit softer and snugglier, and I came across the perfect and most softest fleece material while I was searching for backing fabric for my quilt. Which, yes, means I spent forever in the fabric shop looking at pretty patterns and trying to decide what fabric to buy, and walked out of with fabric in three shades of grey. Maybe I should be a bit more adventurous next time?
I also decided to not stuff and topstitch the fins or tail. I prefer them floppy and like how they bounce around when he’s swimming (see below!). I think if I were using a thinner fabric, I’d consider maybe adding batting to make them a bit chunkier, but the fleece I used was pretty chunky so it wasn’t really an issue.
Look at him go with that happy floppy tail!
Friday, 12 February 2016
DIY LABELS!
These labels were really not necessary at all. I don't have an etsy shop or sell things at markets or anything, so these were really just for fun. And unnecessary as they are, these little bad boys make my inner organizer so, so happy haha. I'm not sure why I wanted to make labels in the first place, but my original plan was to print them out myself. But then I learnt that home printed labels quite often don't survive washing machines. The times I've printed stuff on fabric myself, it hasn't really been things I'm gonna throw in the washing machine (like this banner) so it hasn't been a problem, but as I intend on putting these on various sewing projects, like clothes, etc, being able to wash them in the washing machine seemed like an advantage. So I made some labels in Illustrator and ordered a test swatch from Spoonflower for $5. This gave me a total of 32 labels (technically 36 but the top row got cut in half), so not exactly breaking the bank! I added backing to make them a bit sturdier, and then cut them out freehand with a pair of scissors. I definitely could have been more accurate here and used a straight edge and a rotary cutter, but as I said, these are really just for fun.
And of course I had to add one to my quilt straight away. In an ideal world I would have had the label on before I made the quilt, so that I could have machine stitched it on a bit neater, but my hand stitching isn't too bad, right? Looking forward to adding them to future projects!
Labels:
sewing
Thursday, 4 February 2016
A CHEATER'S QUILT
Somehow, I got it in my head that with a new baby on the way, I had to make
a quilt. A quilt for him to snuggle up in, play on and make forts out of. I guess I've entered the nesting phase? And while we're waiting on our bedroom to get sorted before we can start on the nursery, I might as well spend my nesting efforts on projects.
I've seen so many beautiful modern quilts around, with solid colors and geometric patterns, and they're so inspiring. But I've never made a quilt before, and I know they're a lot of work and quite time consuming to say the least. And believe it or not, I have some self-insight. I know I often get carried away making plans for big, elaborate, time consuming projects that would turn out awesome if only I just got around to finishing them. But I get bored. I want to start something new. My morganite cardigan is still in my knitting basket next to the couch, and this crochet hexagon blanket is still embarrassingly unfinished (though I do occasionally drag it out and add to it, and it's a lot bigger now!). Not to mention my list of project ideas that haven’t even begun to materialize. And when I asked my friend who recently decided to make a quilt how she was finding it, she replied that it was "bloody hard work," and that "the cutting of the squares takes so long!" So I was quite skeptical that making a quilt was a good idea for me.
But then I came across the concept of cheater quilts. They're genius. Only two bits of fabric with batting in between. No spending ages trying to decide which fabrics to use. No cutting. No fretting over uneven pieces and no wonky alignments. And after seeing all the beautiful ones Kate from SeeKateSew has made, I was sold.
I've seen so many beautiful modern quilts around, with solid colors and geometric patterns, and they're so inspiring. But I've never made a quilt before, and I know they're a lot of work and quite time consuming to say the least. And believe it or not, I have some self-insight. I know I often get carried away making plans for big, elaborate, time consuming projects that would turn out awesome if only I just got around to finishing them. But I get bored. I want to start something new. My morganite cardigan is still in my knitting basket next to the couch, and this crochet hexagon blanket is still embarrassingly unfinished (though I do occasionally drag it out and add to it, and it's a lot bigger now!). Not to mention my list of project ideas that haven’t even begun to materialize. And when I asked my friend who recently decided to make a quilt how she was finding it, she replied that it was "bloody hard work," and that "the cutting of the squares takes so long!" So I was quite skeptical that making a quilt was a good idea for me.
But then I came across the concept of cheater quilts. They're genius. Only two bits of fabric with batting in between. No spending ages trying to decide which fabrics to use. No cutting. No fretting over uneven pieces and no wonky alignments. And after seeing all the beautiful ones Kate from SeeKateSew has made, I was sold.
So after much humming and hawing and trying to decide which one to go for, I ended up with a yard of this one from Spoonflower. I love the color combination and I decided one yard would be a good size to start with. I've never used Spoonflower before, but must say I was quite impressed, both price and delivery speed! The fabric arrived two weeks after, and I headed to my local fabric store the next day to pick something to back it with. My original plan was to back it with a simple black and white repeating pattern, but after spending an hour and a half in the store and not really finding any that I liked, I came to the somewhat boring conclusion that I don't really like most patterns, and ended up with a nice solid charcoal cotton. I love how it turned out against the blues, that it's not very busy, and that the white thread contrasts with the dark grey.
Don't get me wrong, this blanket is far from perfect and full of flaws, but I kinda like that too. And it certainly took me longer than an hour to make, but it's a bit hard to stick to your schedule when your mom drops by halfway through for a chat and a cup of tea. But I love the results and can't wait for it to get put to use!
Tuesday, 13 October 2015
THE CUTER BOOK
I've probably mentioned this before, but when I lived in Glasgow, I used to go to a sewing class on Tuesday afternoons called Say It Ain't Sew led by the wonderful Iona Barker. It's a beginner's class open to anyone, and every week you tackle a little sewing project. And when we visited Scotland last Easter, I managed to squeeze in a little Say It Ain't Sew time! As it was Easter, the project of the day was of course to sew little bunnies, and Iona brought this book, The Cuter Book from Aranzi Aronzo. I made the Haha Bunny and added some googly eyes, and I also got a chance to look through the rest of the book though, and pretty much had to have it. And voila! It is now in my craft book collection.
It's crammed full of super cute little felt animals to sew, and I have so many ideas of things I want to make out of the patterns in this book. I have a few friends who are expecting babies soon, and how cute would a mobile made out of the Birdies or the Munkys be? Or as an applique detail on a dress for my niece? I've been meaning to make her one out of the leftover fabric from when I made this dress (and how cute will we be when we're matching haha). Or, even better, blowing up the patterns and making actual sized teddy bears? Have you guys acquired any good craft books recently?
Labels:
sewing
Tuesday, 4 August 2015
DIY TARTAN SKINNY TIE
As Graeme's Scottish, he'll be sporting a kilt in our ever approaching wedding. And as a wedding present from his parents, he got a custom made kilt with all the trimmings in their clan's tartan. A few weeks ago it was finished, so he managed to pick it up while we were in Glasgow for a friend's wedding and it's currently hanging in his closet! And as the tartan was made to order, it came with a roll of leftover fabric. I had my own ideas of stuff to make, but Graeme requested I make him a tie, bow tie and pocket square. You know, so that he's covered as far as McMillan tartan accessories goes.
But as I've already made him bow ties (like this knitted one and this tartan one), he might need to wait a bit longer for that one. But I've never made a tie before, so that sounded fun. I used this pattern from See Kate Sew, which is simple and easy to follow. Though I think if I were to make it again, I'd probably add about 10 cm to the length of it and try to make it all in one long piece rather than two. And as the tartan fabric is quite thick to begin with, I probably shouldn't have added interfacing, as I think it would have been thick enough on its own. But doesn't he look spiffy? It'd be fun to make more of these, in all sorts of patterns. Though I probably shouldn't say that too loudly, or ties will be all I'm sewing from now on.
Labels:
DIY projects,
sewing
Sunday, 21 June 2015
HIS & HER DIY JEAN SHORTS
Look at us being all coupley and matching! The Glastonbury Festival is this week, and Graeme and I and some friends are going. I've wanted to go forever, and I'm so excited! And for once (potentially a first?) I've actually started packing and getting organized in advance. I've got hand sanitizer, blister plasters, torches, sunscreen. My Diana F is loaded and ready to go. I feel so prepared.
As for what I'll be brining clothes-wise, this is a British festival after all, and I've been to enough of them to have learnt the lesson of how unpredictable the weather can be. Flashback to T in the Park 2007, when it rained so much the whole campsite turned into a mud bath, and then the sun came out the next day and we all got sunburned. So while I'm packing a few more practical items, I'm still hoping for sunshine and wanted to get a pair of black shorts. But after a failed shopping trip where I tried on a bunch and liked none, I decided to make my own out of an old pair of jeans I already had.
I made these by using a pair of shorts I already have as a template. I find that the easiest way of doing this is by wearing the shorts on top of the jeans you're about to cut, marking with pins where they end and cutting about an inch below that (for the rolled up variety--if you just want cut offs then just cut along your marks). Take everything off (keeping the pins in), and then roll them up using the pins as a guide, pin in place and sew. It feels a bit silly putting your shorts on over your jeans, but I feel it leaves a lot less room for error, and my chances of cutting my shorts too short and ruining them decrease drastically. And while I was working away on my shorts, Graeme showed up with an old holey pair of jeans wanting jean shorts too. So here we are, matchin' away, ready for Glasto!
Labels:
DIY projects,
sewing
Saturday, 2 May 2015
DIY PRINTED BANNER
I don't usually blog much about work and I don't plan on starting, but I recently got the news that I would be offered a redundancy package. Being the least experienced and newest in the department, it wasn’t exactly a
massive shock to me as they had announced that redundancies would be made
earlier in the year, but regardless—that kind of news are never any fun. Either
way, I’m pretty optimistic about the whole situation and new opportunities that
will ultimately arise from this, and I’m confident that I’ll find a new job soon.
And in the meantime, it’s just a little extra time to enjoy the summer, work on
some projects around the house, and organize our wedding in August, right?
So with
that in mind, I figured I’d make myself a printed banner with some wise words of wisdom printed on them. I've seen tons of these around the web, and I love how cute and simple they are. And the phrase is of course a reference to Douglas Adams' Hitchhiker's Guide to the Galaxy, which I think might be one of my favorite books. I made the image using the font Langdon, and I used this technique to print the image onto
fabric. I don't have the best printer in the world, but i quite liked the worn effect I got here. I then hemmed the sides and used a large, wooden BBQ skewer to mount it
on, and ta-da! I haven't quite decided if this will be going in our studio downstairs, or if it will be going next to our dog Bo's bed, as it looks pretty cute there and she's very nervous and panics about most things.
On a completely different note, today Graeme and I spent 4 hours in IKEA, waiting to order our kitchen. We usually try our best to avoid IKEA on a Saturday in the first place, but it was the last day of their special kitchen deal so all we could do was to suck it up with all the other kitchen buyers. More on this later!
Labels:
DIY projects,
sewing
Saturday, 28 March 2015
DENIM SHIRT TO DENIM SKIRT
I've been experiencing a bit of sewing performance anxiety recently. My parents bought me a new sewing machine for my birthday, a Janome 2030DC. It's awesome. It’s a world
away from my old machine, a John Lewis mini. Don’t get me wrong—I LOVE my JL
mini. It’s red and super cute. It’s tiny and light weight and really easy to transport,
which was very handy when I was doing my Åsom sewing course. Not to mention, I’m
a bit sentimentally attached to it, as it was a spontaneous gift from Graeme
when we first started dating—I’d seen it in store and mentioned to him how cute
it was, and then one day I came home and there it was, sitting in my bedroom. I've
since used it for tons of projects, including several dresses and skirts and
pillows and other projects. But lately the seams have come out a bit wonky. And
let’s be honest, there’s a lot of things the JL mini just isn't made to do.
Enter the Janome 2030DC. It has a ridiculous amount of functions (especially for someone used to
using what is essentially a kids’ machine). Every time I turn it on, I squeal with
excitement as the LCD screen lights up. And so many features! It’s got 30 seams!
Various feet! It can make button holes like no other. When I made this skirt with my old
machine, I had to do various
calculations to determine the button hole size, and then do each one by hand,
which took me about twenty minutes each and didn't even end up being even. No more of that! In short, this
machine is a bit of a revolution. And I've been pinning tons of inspiration and
projects to try. But, where to start? With great sewing machines come great sewing
expectations, right? (teehee—see what I did there?)
But
eventually, after trying to decide between all sorts of elaborate ideas, I
ended up just sewing something that’s been on my to-sew list for a while: turning
an old denim shirt into a denim skirt. Said shirt used to be a bit of a
favorite (aka. I used to wear it far too often), and I was absolutely gutted
when it tore, so it’s nice to be able to breathe some new life into it! To turn
it into a skirt, I cut across under the arms, cut and hemmed the bottom, and
used fabric from the sleeves to make a waistband. I meant to cut it a bit
higher, so that I could use one of the buttons on the shirt in the waistband,
but alas I ended up accidentally tearing it and went with plan B: using a clasp from an old pair of suit pants. And as a result of the tearing it ended being a bit shorter than what I had planned, but I’m still
pretty happy with the results. Looking forward to wearing it bare-legged in the
summer!


Hoping this will put my sewing performance anxiety to an end! Can’t wait to
try that button hole function.
Labels:
DIY projects,
sewing
Sunday, 1 February 2015
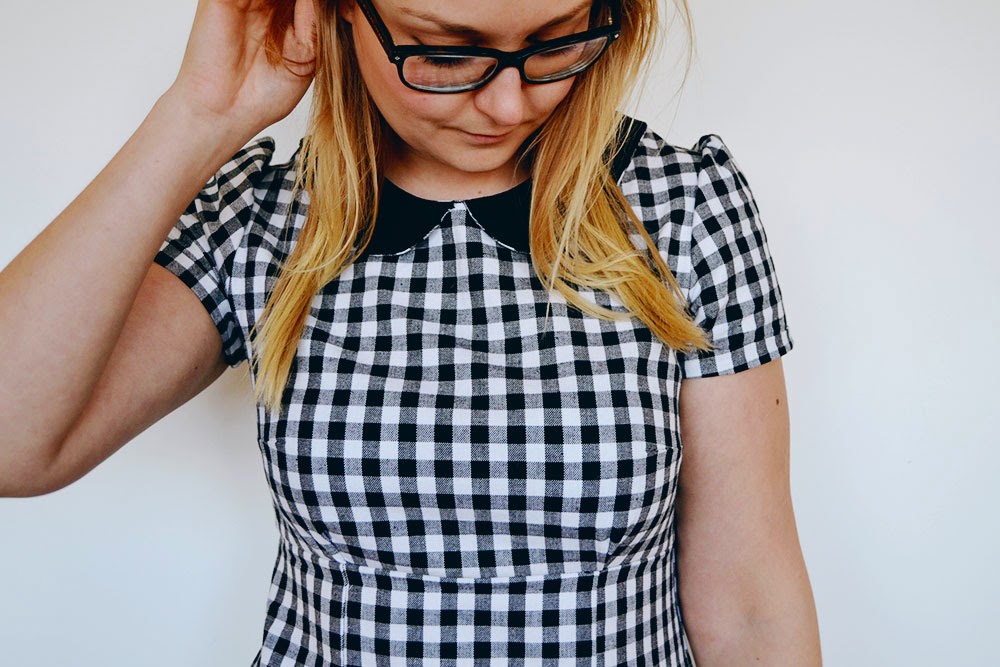
GINGHAM MEGAN DRESS
Woohoo! I finished my Megan dress from Love at First Stitch by Tilly Walnes! I actually started this way back in November in my sewing class, but then basically didn't touch it all through December or January, until I finally picked it up again this weekend. And here we are, dress complete! High five for a productive weekend.
I decided to add a contrasting peter pan collar and rolled up sleeves. I didn't actually have a pattern for the collar, so I basically just made it up based on the pattern for the neckline. All the seams are neatly finished with bias binding on the inside. And I'm so happy with the fit. I was a bit worried for a while, when I got to the bit where you're supposed to sew the zipper and I realized it was waaay too big. I guess I was a bit off with my measurements, as I ended up cutting off 5 cm at both sides. I'll need to keep that in mind for next time I make it. Cause there definitely will be a next time. Maybe a floral version?
Labels:
DIY projects,
sewing
Subscribe to:
Posts (Atom)