Tuesday, 5 November 2013

KNITTED BUNNY SLIPPERS

I’ve been obsessing over knitting a bit lately. It all started with the mini hats I knitted for the Innocent Big Knit, and somewhat escalated from there. I first knitted Graeme a pair of slippers as he was complaining about his feet being cold. Then I decided I should probably knit myself a pair as well, only I wanted them to be bunny slippers as I’ve pretty much always wanted a pair. Then I got my copy of Pompom magazine in the post and the list of things I need to knit has now grown rather huge. I don’t even know how I’ll find the time to knit half of all the things I want to knit. I’ve been pretty busy lately, and to top it off I also managed to slice my index finger which mad me unfit for knitting for about two weeks (don’t worry—I’m ok. Though there was definitely a moment of panic amidst the bloodshed as I was bandaging myself up and being dramatic and googling how deep a cut can be before you need stitches).

But this weekend, finally, I managed to complete my bunny slippers. I’ve pretty much living in them ever since! They make me so happy and keep my feet nice and warm as the days are getting colder. They’re so easy to knit as well, as you knit the whole slipper in one piece in a stocking stitch using double pointed needles starting at the heel and finishing at the toe, and then you just attach the ears and pompom tail. I knitted them for my own feet which are about a UK size 5/European size 38  (so the cm measurements below are accordingly), but they can easily be adapted to fit any size by trying them on as you knit. I knitted these in grey and white wool, and used scraps of dark grey and pink yarn for the bunny faces. As you can probably tell, I’m no expert at making knitting patterns but here’s how I made these:

For the slipper: Cast on 40 stitches on two size 3.5 double pointed knitting needles. Knit the first row, and then continue to purl and knit every other row. Once you have reached 15 cm or until it reaches the middle of the top of your foot, attach the ends of the piece together so that you’re knitting in the round using five double pointed needles and have 10 stitches on each needle. Continue knitting for about 5 cm, or reaches the widest part of your foot. Now for the decreasing to make the toe part: knit 10 so that you are on the side of the slipper. Knit 1, knit 2 together, and knit 7 (to the end of the needle). Then knit 7, knit 2 together, knit 1. Repeat this decreasing pattern until you have 5 stitches on each needle. You should have a pretty neat decreasing edge on each side of the foot. Stitch the heel together.
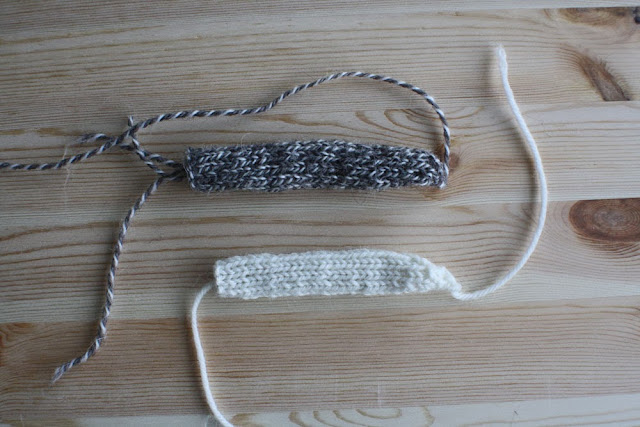
For the ears: Cast on 12 stitches of grey wool. Knit the first row, then continue to purl and knit every other row until your piece reaches about 8.5 cm. Decrease by knitting 9, knitting 2 together and knitting one, then purling 8, purling 2 together and purling 1, until you have 3 stitches left. Cast off. Cast on 10 stitches of white wool. Knit the first row, then continue to purl and knit every other row until your piece reaches about 8 cm. Decrease by knitting 7, knitting 2 together and knitting one, then purling 6, purling 2 together and purling 1, until you have 3 stitches left. Cast off. Assemble by placing the white piece inside the grey piece. It should curl up so that the grey piece will surround the white piece. Stitch it together so it stays in place.
To assemble the whole slipper, stitch the ears onto the slipper, and embroider a bunny face on the toe. Make a small pompom for the tail (I used the fork method) and attach it to the back of the heel. Put them on and enjoy! Perfect to enjoy on a duvet day, or maybe as a present for someone?

Friday, 1 November 2013

OCTOBER ON INSTAGRAM

While everyone’s still going on about autumn, I’m starting to get a serious winter feeling. We are now in November, and it’s been pretty stormy and rainy recently. Today I woke up to a pretty intense hail and thunderstorm banging on my bedroom roof! I love a good storm though, and especially when I’m cuddled up inside in a blanket. I'm looking forward to a cozy winter in front of the fireplace!

So looking at October on instagram, I realize I've been taking a lot of pictures of food this month. I think it's the cold weather making me want to cook more. It's been a busy month! Graeme left for the UK on the first, so it's been strange just being me and Bo in the house. Graeme and I had a weekend break in Glasgow, though it was more business than pleasure as we basically spent the whole weekend clearing out the flat (we're getting it ready for renting out). Also finally got to enjoy the homebrew! Will definitely be making our own brew again.

Hope you had a good month too!

Sunday, 27 October 2013

APPLE CHUTNEY


I didn't get a massive amount of apples in the garden this year. My poor tree only produced a total of 11 apples, and two apples were lost to Bo once she realised that apples are toys you can eat once you're done playing with them. I'm not entirely sure why there was such a bad apple harvest, considering a few years ago there were so many apples my mom managed to fill half the basement with jars of apple jelly, and considering the plum tree was full this year. I was determined to make something out of the apples though, so I bought a couple of extras and decided to turn my tiny little harvest into chutney.

This chutney is both quick and simple to make, and it'll make your whole house smell delicious. It'll mature and the flavours will develop in the jars, and will last up to a year in the sealed jars. Though obviously if you want some straight away, I wouldn't hold it against you.


Apple chutney recipe (makes about 1 kg of chutney):
1 kg cooking apples
1 large onion
250 g raisins
250 g sugar
1 tsp salt
2 tsp ginger
2 tsp mustard seeds
1 tsp nutmeg
500 g cider vinegar


Directions: 
Peel and core apples, and cut into chunks. Finely chop the onion. Combine all the ingredients in a large pot. Bring to a boil, then let it simmer for half an hour until thick. Transfer to sterilized jars, and seal.

Apple chutney works great with a pork roast, or even just with some cheese on toast or crisp bread. Cheesy toast and chutney is always a winner.


Sunday, 20 October 2013

TABLE MAKEOVER

So this is kind of old news, as it was actually a few months ago I revamped this table, so I’ve already been using it for a while now. I had plans of posting it then, but somehow got a bit side-tracked. But without further ado, here is a very belated post of my table makeover!

Since I moved back to Norway, I’ve been living in my parents’ old house. When I moved in, they were living in Spain but still had all their furniture in the house, so I didn’t really need anything. They’ve since returned to Norway, but have moved into a new flat and thus taken majority of their furniture with them. One of the first things I needed when they moved out was a kitchen table, so I went on finn.no and found a round wooden table with 6 sturdy chairs a local pastor was selling for peanuts. I wasn’t massively into the super strong blue it was painted though (see before phone pic taken at the pastor’s house), so I decided to renew it a bit and give it a lick of white paint. It was a much longer process than what I had anticipated, and I ended up having to do 3 - 4 coats before I was satisfied as the blue was so strong it kept shining through. Very happy with the final result though, and looking forward to eating lots of meals here!  


Sunday, 13 October 2013

LOMOGRAPHY OKTOMAT

I gave up on this camera a long time ago. I was so excited when I bought it, roughly four years ago. The first film turned out awesome. There were light leaks and distorted colors, and the photo sequences were like mini analog movies. I brought the camera with me to California, and took some awesome pictures there too: a couple shots from Coachella, my friend dropping his ice cream in Dolores Park—but when I got the film developed it was blank. I was devastated and didn’t touch the camera for about 2 years, until now. I assumed it was broken, it was only a plastic toy camera after all. But then for some reason, I decided to try it out again and brought the camera with me to my parents cabin in Hausvik. I had pretty low expectations when I handed in two rolls of film, and sadly I only got one roll back. But the photos that actually got successfully developed reminded me all over again why I was so excited about this camera in the first place. 


Since it captures the subject in 8 different lenses over 2.5 seconds, it’s great for capturing movement. And because of this, I have a tendency to point the camera at people and commanding them about. “Jump!” “Do something!”  “Move about!” Graeme usually responds with a groan. Bo's a bit more cooperative. 


Can't wait to use this camera lots more!