Friday, 23 November 2012

DIY CROCHET JAR LANTERNS

This is actually a project I finished off right before I left Glasgow, but couldn't find the time to blog about. Seeing as it pretty much starts to get dark around three in the afternoon now, I've been lighting candles to make the place feel a bit cozier. I'm one of these people who really like candles, but I always forget to burn them. So I decided to get into my candles a bit more by making these crochet jar lanterns. I love the cozy vibe they give, and how they look almost like little igloos for your candles. Did you ever make snow lanterns out of snowballs as a kid? These are a bit like the crochet version of that. Not to mention it's a super easy beginner's crochet project and can easily be finished while watching TV. Hello winter coziness!

Instructions for the pattern on the larger jar:

Steps 1: Using a size 5 needle, make a foundation chain of five stitches. Step 2: Work a slip stitch into the first chain to create a loop. Step 3: Work a chain of three stitches to act as your first treble, and then add two more trebles to form a cluster. Step 4: Work a chain of three stitches between each cluster all around your foundation loop. As my jars were quite narrow, I started out with three clusters, but if your jar is of the thicker variety then feel free to add another cluster.


Step 5: Start the next row by making a chain of three stitches to form your first treble. Step 6: Add two more trebles to the cluster, work a chain of three slip stitches, and then another cluster of three trebles. Step 7: Continue around the circle adding two clusters of three trebles into each space, and separating each cluster with three slip stitches. The result should roughly be able to cover the bottom of your jar. Step 8: Crochet the next rounds by adding a cluster of three trebles in each space, and separating with three slip stitches. Repeat this until your cover is long enough to fit your whole jar. My jar was quite tall, and I ended up doing thirteen rows like this. Once you're done, loop off, pull it on the jar and tighten.

Instructions for the pattern on the smaller jar:

Step 1: Start off in the same way as the first jar (steps 1 and 2) to form a foundation loop of five foundation chains. Work a chain of four stitches. Step 2: Work a treble into the foundation loop. Step 3: Continue the round by adding trebles to the foundation loop and separating them with a single slip stitch. In other words: treble, slip stitch, treble, slip stitch, etc. Again as my jar was quite narrow I did a round of six trebles. If your jar is a bit larger you might want to add another two. Step 4: Do the next row by doubling the amount of trebles. Work two trebles separated by a slip stitch into each space, so that you end up with twelve trebles in total, all separated by a slip stitch (or sixteen if you started out with eight trebles for your first row). This should roughly be the size of the bottom of your jar. Continue the rest of the lantern by crocheting a treble in each space and separating each treble by a slip stitch until it's long enough to cover your jar. Once you're done, loop off, pull it on the jar and tighten!

Now light some tea lights and pop 'em in!

Thursday, 22 November 2012

PLEASE EXCUSE THE RADIO SILENCE...

The past week has been pretty hectic, with my parents visiting from Spain, my masters graduation, and then eventually me moving countries back to my homeland! It's taking me a while to get settled in properly, so in the meantime, please feast your eyes on this rather silly photo of myself and Bo, wearing our matching Marius sweaters my mother kindly knitted for us.


Will get back to normal blogging soon!

Sunday, 11 November 2012

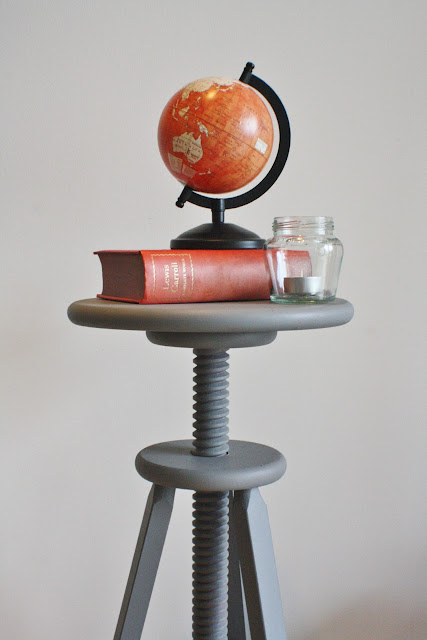
STOOL MAKEOVER


I was perusing Salvation Army's furniture section when I came across the above stool for only two quid. Two quid! I pay more for sandwiches!  Sure it was wobbly, but I figured a slick of paint and it'd be good as new. I happily snapped it up and threw it in the trunk of our car. A few hours later, as I was having a conversation with Graeme and trying out my new awesome new stool, it collapsed on me. I was mid-sentence when I suddenly found myself lying on the floor in a pile of red sticks, looking up at a shocked and bewildered Graeme. Laughter and diet-jokes ensued.


After closer inspection, it was clear that the stool was structurally unsound due to a bit of a design flaw, and it made a lot more sense why the thing had only been two pounds. The bars supporting the stool-legs were about a centimetre longer then they should be, meaning the legs had become twisted in an attempt to stay together and the screws had become rusty and crooked. This wasn't going to be as straight forward as I had hoped.


The stool then sat in a corner of our living room for a few weeks with its legs pointing in every direction, while I pondered how to approach the situation. Friends referred to it as "an abstract sculpture" and laughed when I told them I'd paid two whole pounds for a broken stool. Eventually, I decided to take the whole thing apart, rusty crooked screws and all and then attempt to reassemble it. After a bit of fiddling about with wood glue, our trusty drill and two licks of Dulux' Urban Obsession and the stool was reformed back to its former glory. I'm still a bit nervous about actually sitting on it though!

Friday, 9 November 2012

WHAT I'M WORKING ON - LINO PRINT MONSTER

Here we go again with another project it'll take me forever and a day to finish. I've been playing about and making a few lino prints recently, but then I decided to go ahead and make a rather large and detailed one. You can see my monster face is coming along though, soon he'll be able to see with two eyes! Meanwhile, maybe I'll figure out what I should actually use him for once he's done. Printed tote bag? Pillow? T-shirt? Any other suggestions?

Wednesday, 7 November 2012

POLKA DOT PLATE DIY


Last year, Graeme did a project as part of his course that involved drawing on plates. For this project, he used a porcelain marker to draw on glass. I've seen a lot of projects on pinterest where people use sharpie markers to draw on mugs and plates, but a downside of this is that it's not dishwasher safe. I kind of have this policy where I don't really invest in cutlery or crockery that's not dishwasher safe, because I'm not really a fan of doing dishes. I spent a significant sum buying a dishwasher, so I feel standing around doing dishes would be somewhat defying the point of that purchase. This marker however, promised to be dishwasher safe, so I decided to try it out.


We have a set of black plates and bowls, so I decided to go for some irregular polka dots to add a bit of a whimsical pattern to compliment the black plates. The whole process took about 5 minutes, as all you do is draw right onto the plate. No need to bake in the oven or any of that time consuming stuff.


Since my plate was from Poundland and the marker was leftover from one of Graeme's projects, this ended up being super cheap. Benefits of living with a graphic design student! I don't know about you, but my head is now buzzing with ideas though, so I'm going to have to go out and buy lots more plates and markers in different colours!

Monday, 5 November 2012

DEATH OF AN INSTAGRAM ACCOUNT


It's been almost a week and a half since our Halloween party when my beloved iPod touch went missing and there is still no sign of it. We've turned the flat upside down trying to find it, but it's no where to be found. It's funny how you can live so long without something, but then once you have it and then lose it it's a whole other story. For the first few days I felt so lost, not being to check my email whenever I wanted or use my apps. All of a sudden I had to turn on my computer if I wanted to google something. How was I supposed to go running without my running app? Or plan for the weekend without my weather app? How on earth did I ever manage to do anything at all before I ever had this gadget?

The app I missed the most though, was of course instagram. I wouldn't say I was ever an instagram addict, but I was still a pretty big fan. What I loved most about instagram is how you ended up taking so many photos you otherwise wouldn't have. Lots of little memories that otherwise would have been forgotten. And since you were taking so many pictures all the time, you ended up improving your photography skills so much. Graeme and I love our photo adventures, but we usually take our analog cameras with us. We have so many, both toy ones like the Lomography Fisheye and Dianas and an octomat, as well as old Olympus SLRs and Graeme's favourite Olympus Trip. But it's so much harder to improve your skills when you have to wait for film to get developed to find out what you're doing right and what you need to work on. We have digital cameras as well of course, but usually didn't think to bring them along. Sad as it sounds, my digital SLR has almost ended up being a camera mainly used for photographing projects, food and holidays. And that's no way to treat a digital SLR camera.


So I guess that's the good thing that has come out of my iPod going missing. Always a silver lining, right? For the past week and a half, I've made much more of an effort to bring my digital SLR with me to capture every day things and to improve my skills, and I definitely plan on keeping it up.

Happy Guy Fawks Day!


(Though I'll probably be investing in a smartphone once my contract runs out in February! Haha)

Friday, 2 November 2012

TOMATO BASIL BRUSCHETTA


There's something funny about bruschetta. I mean, technically, it's just toast. But then it's so much more than just toast. Bruschetta can be served with so many different toppings, but tomato and basil is of course a classic. Juicy tomatoes and fresh chopped basil makes a ridiculously refreshing combo.

It's also ridiculously simple to make, not to mention quick! In retrospect, I'm not sure why it took me so long to make bruschetta in the first place. Great as an appetizer, but also great as an antipasti. I quite often like to make antipasti dishes for dinner, and I often struggle to come up with vegetarian ones to suit Graeme, so this will definitely be making it onto the menu more often. So easy, so tasty.


Balsamic tomato basil bruschetta recipe (makes 6 slices):
6 thick slices of Ciabatta (or similar)


2 tomatoes
40 g basil
1 clove of garlic
1 tablespoon balsamic vinegar
pinch of flaky sea salt
olive oil

Directions: First make the topping. Chop the tomatoes and basil and place in a bowl. Add sea salt, balsamic vinegar and one table spoon of olive oil. Mix it all together. Then, place the ciabatta slices on a baking tray and drizzle both sides with olive oil. Put in the oven for a couple minutes until brown. Take them out, flip them over, and toast the other side too. Once they're done, use a knife to crush the garlic clove, and then rub the garlic into the toast. Top with the tomato and basil mix, and serve! Yummies!


Thursday, 1 November 2012

WHAT I'M WORKING ON - CROCHET HEXAGONS

The weather has been absolutely horrible recently, and the sun has started to set far too early for my liking. Rain, rain, wind, rain, darkness. The cold is setting in and the weatherman keeps threatening/promising snow, so I guess it's pretty safe to say that winter is here. To prepare myself for what lies ahead, I've started crocheting a blanket. A very summery, completely out of season blanket. Surely the colour scheme won't affect its warming abilities, right?

For the particular design I decided on, I have calculated that I need to make a minimum of 289 hexagons, consisting of 5 yellow, 5 orange, 5 pink, 5 dark pink, 5 blue and 264 white. So far I have made 58 hexagons, so only 231 left! Yay!


Who knows, chances are this won't be finished until next summer anyway!